RecyclerView is a ViewGroup added to the android studio as a successor of the GridView and ListView. It is introduced in Marshmallow.
RecyclerView has been created to make possible construction of any lists with XML layouts as an item which can be customized vastly while improving on the efficiency of ListViews and GridViews.
RecyclerView recycles the views which are out of the visibility of the user. For example, if a user scrolled down to a position where items 4 and 5 are visible; items 1, 2, and 3 would be cleared from the memory to reduce memory consumption.
The RecyclerView class extends the ViewGroup class and implements ScrollingView interface.
Implementation
To implement RecyclerView following three things needed.
- The Card Layout: It is an XML layout which will be treated as an item for the list created by the RecyclerView.
- The ViewHolder: It is a java class that stores the reference to the card layout views that have to be dynamically modified during the execution of the program by a list of data obtained either by online databases or added in some other way.
- The Data Class: It is a custom java class that acts as a structure for holding the information for every item of the RecyclerView.
RecyclerView makes it easy to efficiently display large sets of data.
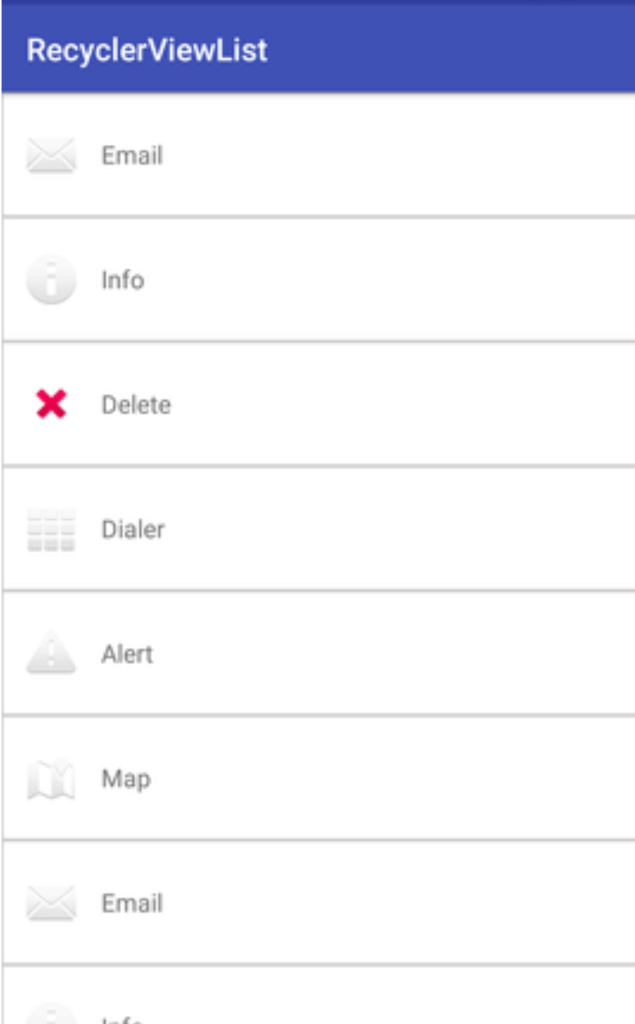
Android RecyclerView List Example
Create an Android project, and add the RecyclerView support library com.android.support:recyclerview-v7:23.1.0 or above this version in build.gradle file.
In the activity_main.xml file in layout directory, add the RecyclerView widget.
<?xml version="1.0" encoding="utf-8"?>
<android.support.v7.widget.RecyclerView
        xmlns:android="http://schemas.android.com/apk/res/android"
        xmlns:tools="http://schemas.android.com/tools"
        android:layout_width="match_parent"
        android:layout_height="match_parent"
        android:scrollbars="vertical"
        android:id="@+id/recyclerView"
        tools:context="example.eywiah.com.recyclerviewlist.MainActivity">

</android.support.v7.widget.RecyclerView>
Create a dimens.xml file in values directory, and add the following code.
<?xml version="1.0" encoding="utf-8"?>
<resources>
    <dimen name="activity_horizontal_margin">16dp</dimen>
    <dimen name="activity_vertical_margin">16dp</dimen>
    <dimen name="ic_clear_margin">56dp</dimen>
</resources>
Create a custom layout list_item.xml file with following code. (The Card Layout)
<?xml version="1.0" encoding="utf-8"?>
<RelativeLayout xmlns:android="http://schemas.android.com/apk/res/android"
    android:id="@+id/relativeLayout"
    android:layout_width="match_parent"
    android:layout_height="?android:attr/listPreferredItemHeightLarge"
    android:background="@drawable/border">

    <ImageView
        android:id="@+id/imageView"
        android:layout_width="wrap_content"
        android:layout_height="wrap_content"
        android:layout_centerVertical="true"
        android:layout_alignParentStart="true"
        android:layout_alignParentLeft="true"
        android:layout_marginStart="@dimen/activity_horizontal_margin"
        android:layout_marginEnd="@dimen/activity_horizontal_margin"
        android:contentDescription="Icon" />

    <TextView
        android:id="@+id/textView"
        android:layout_width="wrap_content"
        android:layout_height="match_parent"
        android:layout_toEndOf="@id/imageView"
        android:layout_toRightOf="@id/imageView"
        android:gravity="center_vertical"
        android:textSize="16sp"/>

</RelativeLayout>
Create a border.xml file in the drawable directory which is used to decorate the border of RecyclerView items.
<?xml version="1.0" encoding="utf-8"?>
<shape xmlns:android="http://schemas.android.com/apk/res/android"
    android:shape="rectangle">
    <solid android:color="#FFFFFF" />
    <stroke
        android:width="1dp"
        android:color="#CCCCCC" />
</shape>
Create a MyListData.java class with the following code. (The Data Class) This class is used as (POJO) class which sets the properties of the items.
package example.eywiah.com.recyclerviewlist;
public class MyListData{
    private String description;
    private int imgId;
    public MyListData(String description, int imgId) {
        this.description = description;
        this.imgId = imgId;
    }
    public String getDescription() {
        return description;
    }
    public void setDescription(String description) {
        this.description = description;
    }
    public int getImgId() {
        return imgId;
    }
    public void setImgId(int imgId) {
        this.imgId = imgId;
    }
}
Create a MyListAdapter.java class and add the following code.
- It extends RecyclerView.Adapter class and override its unimplemented methods.
- The onCreateViewHolder() methods inflates the list_item.xml(The Card Layout).
- In the onBindViewHolder() method each data items are set to each row.
The Adapter: The adapter is the main code responsible for RecyclerView.
- It holds all the important methods dealing with the implementation of RecylcerView.
- The basic methods for a successful implementation are:
- onCreateViewHolder: It deals with the inflation of the card layout as an item for the RecyclerView.
- onBindViewHolder: It deals with the setting of different data and methods related to clicks on particular items of the RecyclerView.
- getItemCount: It Returns the length of the RecyclerView.
- onAttachedToRecyclerView: It attaches the adapter to the RecyclerView.
package example.eywiah.com.recyclerviewlist;

import android.support.v7.widget.RecyclerView;
import android.view.LayoutInflater;
import android.view.View;
import android.view.ViewGroup;
import android.widget.ImageView;
import android.widget.RelativeLayout;
import android.widget.TextView;
import android.widget.Toast;


public class MyListAdapter extends RecyclerView.Adapter<MyListAdapter.ViewHolder>{
    private MyListData[] listdata;

   // RecyclerView recyclerView;
    public MyListAdapter(MyListData[] listdata) {
        this.listdata = listdata;
    }
    @Override
    public ViewHolder onCreateViewHolder(ViewGroup parent, int viewType) {
        LayoutInflater layoutInflater = LayoutInflater.from(parent.getContext());
        View listItem= layoutInflater.inflate(R.layout.list_item, parent, false);
        ViewHolder viewHolder = new ViewHolder(listItem);
        return viewHolder;
    }

    @Override
    public void onBindViewHolder(ViewHolder holder, int position) {
        final MyListData myListData = listdata[position];
        holder.textView.setText(listdata[position].getDescription());
        holder.imageView.setImageResource(listdata[position].getImgId());
        holder.relativeLayout.setOnClickListener(new View.OnClickListener() {
            @Override
            public void onClick(View view) {
                Toast.makeText(view.getContext(),"click on item: "+myListData.getDescription(),Toast.LENGTH_LONG).show();
            }
        });
    }


    @Override
    public int getItemCount() {
        return listdata.length;
    }

    public static class ViewHolder extends RecyclerView.ViewHolder {
        public ImageView imageView;
        public TextView textView;
        public RelativeLayout relativeLayout;
        public ViewHolder(View itemView) {
            super(itemView);
            this.imageView = (ImageView) itemView.findViewById(R.id.imageView);
            this.textView = (TextView) itemView.findViewById(R.id.textView);
            relativeLayout = (RelativeLayout)itemView.findViewById(R.id.relativeLayout);
        }
    }
}
Finally, in the MainActivity.java class, add the following code. This class creates the array of items for MyListData class and set the adapter class to RecyclerView.
package example.eywiah.com.recyclerviewlist;

import android.support.v7.app.AppCompatActivity;
import android.os.Bundle;
import android.support.v7.widget.LinearLayoutManager;
import android.support.v7.widget.RecyclerView;

public class MainActivity extends AppCompatActivity {

    @Override
    protected void onCreate(Bundle savedInstanceState) {
        super.onCreate(savedInstanceState);
        setContentView(R.layout.activity_main);
        MyListData[] myListData = new MyListData[] {
                new MyListData("Email", android.R.drawable.ic_dialog_email),
                new MyListData("Info", android.R.drawable.ic_dialog_info),
                new MyListData("Delete", android.R.drawable.ic_delete),
                new MyListData("Dialer", android.R.drawable.ic_dialog_dialer),
                new MyListData("Alert", android.R.drawable.ic_dialog_alert),
                new MyListData("Map", android.R.drawable.ic_dialog_map),
        };

        RecyclerView recyclerView = (RecyclerView) findViewById(R.id.recyclerView);
        MyListAdapter adapter = new MyListAdapter(myListData);
        recyclerView.setHasFixedSize(true);
        recyclerView.setLayoutManager(new LinearLayoutManager(this));
        recyclerView.setAdapter(adapter);
    }
}
Keep in mind, that the drawable mentioned in the XML layouts have to be added to the drawable folder under res of the Android Studio Project.